Table of Contents
The Task
We’ve all been there: out of nowhere, you’re handed a Google Form and told you need to fill it out every single day-or worse, every couple of hours-just to report some mundane status updates.
Let’s be real: manually grinding through the same form fields day in and day out is a soul-crushing waste of time. As developers, our immediate instinct when faced with repetitive tasks is to automate them. So, instead of wasting precious minutes clicking checkboxes manually, let’s write a lightweight Python script to handle the busywork for us.
Just Build It
1. Constructing the Target URL
The public URL of a standard Google Form typically looks like this:
https://docs.google.com/forms/d/e/form-index/viewform
To submit data programmatically, copy that URL and swap out viewform with formResponse:
https://docs.google.com/forms/d/e/form-index/formResponse
2. Extracting the Form Fields
Open up the target Google Form in your browser and fire up your browser’s DevTools (right-click and select Inspect).
Every input box or form field we need to populate will have a name attribute matching the pattern name="entry.id". You can easily locate these in the Elements tab by searching for the keyword entry.
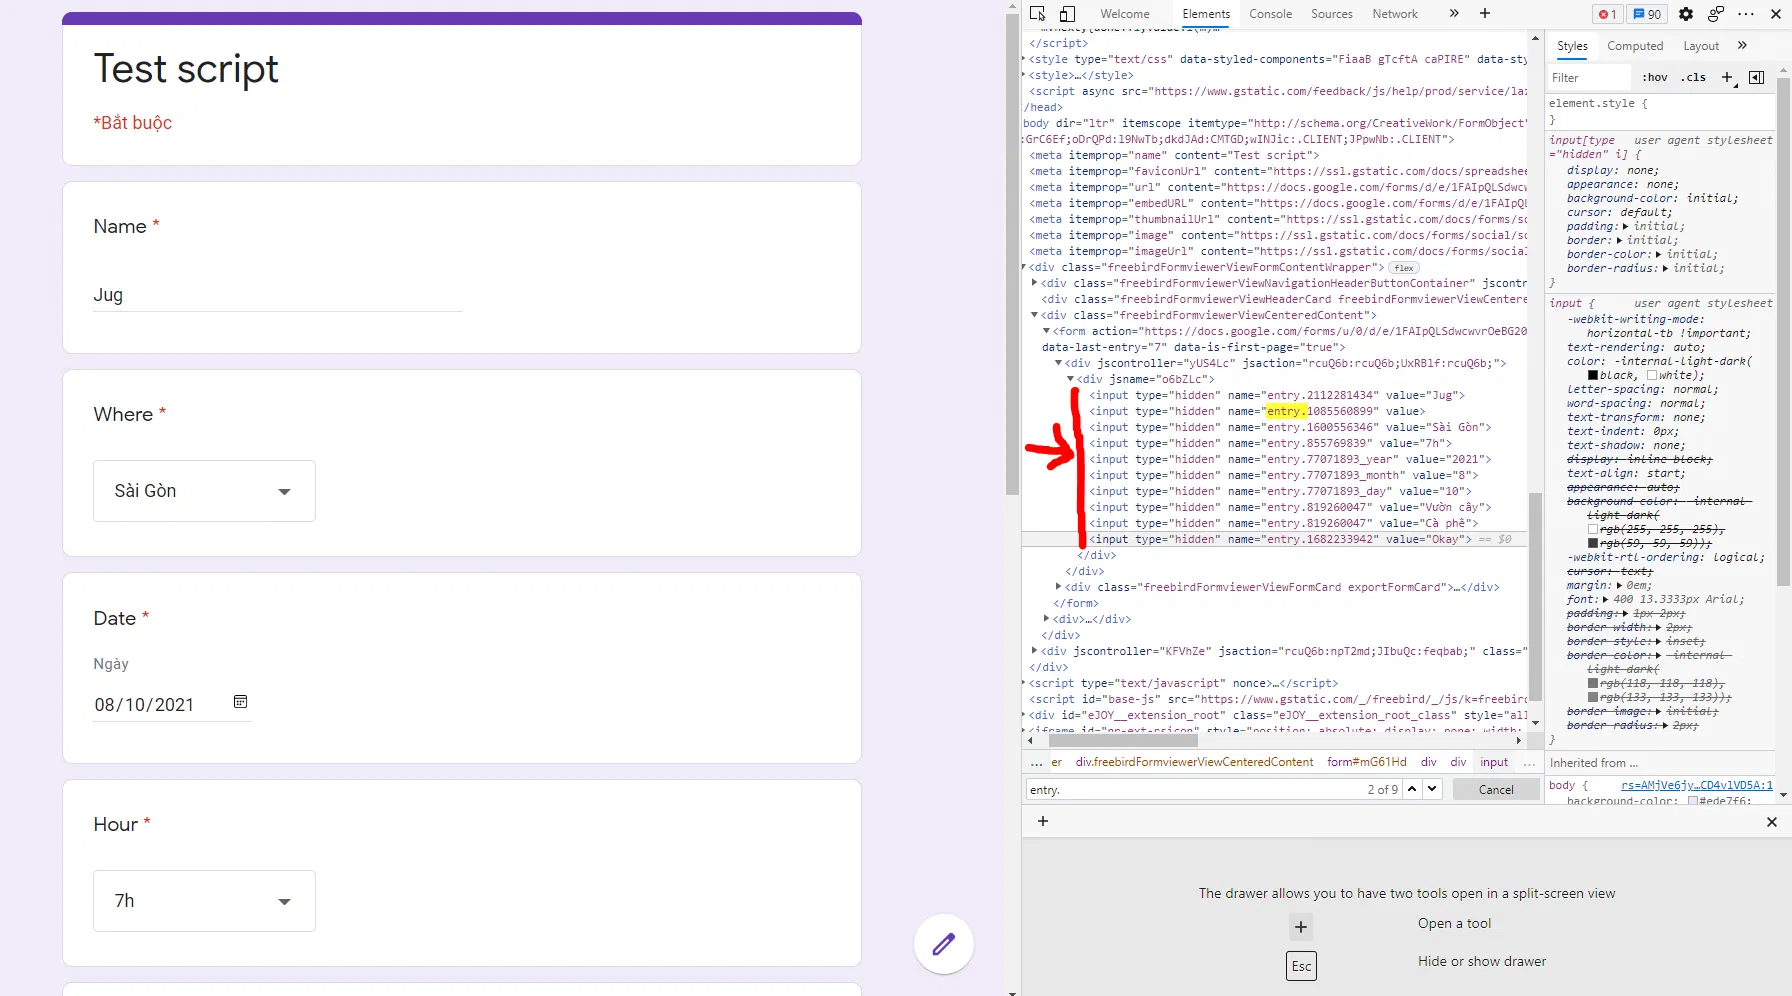
Pro tip: Try filling out the input fields manually to map exactly which id corresponds to which question.
3. Writing the Python Script
Mapping the Form Data
Once you’ve extracted the precise entry IDs and formats for each input field, create a Python dictionary. The dictionary keys will be your entry.id strings, and the values will hold the actual data you want to submit.
import datetime

def fill_form():
    name = 'Your name'
    date, hour = str(datetime.datetime.now()).split(' ')
    date = date.split('-')
    hour = hour.split(':')

    value = {
        # Plain Text Input
        "entry.2112281434": name,

        # Dropdown Menu / Multiple Choice
        "entry.1600556346": "Sài Gòn",

        # Date Inputs (Split into Year, Month, Day)
        "entry.77071893_year": date[0],
        "entry.77071893_month": date[1],
        "entry.77071893_day": date[2],

        # Time / Hour Input
        "entry.855769839": hour[0] + 'h',

        # Checkboxes (Allows multiple values, pass as a list)
        "entry.819260047": ["Cà phê", "Bể bơi"],

        # Single Choice / Radio Button
        "entry.1682233942": "Okay"
    }
    return value
Important Notes:
- You must match the exact string format expected by each input box, otherwise the form submission will fail. (The safest bet is to copy options directly from the live form and paste them into your code).
- For multi-choice checkboxes, ensure you pass your selected values as a Python list.
Automating the Submission
Next, we’ll use a POST request via the popular requests library to send our payload straight to the form’s backend endpoint.
import requests

def submit(url, data):
    try:
        requests.post(url, data=data)
        print("Submitted successfully!")
    except Exception as e:
        print(f"Error submitting form: {e}")

# Fire it up!
url = "[https://docs.google.com/forms/d/e/form-index/formResponse](https://docs.google.com/forms/d/e/form-index/formResponse)"
submit(url, fill_form())
Boom, done!
Check out the source repository here: https://github.com/tienthanh214/autofill-and-submit-ggform
Want to test your setup? Feel free to try it out on this sandbox form: Google Form - Test Script
Running It Daily on Schedule
To make this truly hands-off, you need to host the script somewhere so it runs automatically on a regular schedule.
You can deploy it to Heroku and use the free Heroku Scheduler add-on to trigger the script at specific intervals. Note that while the scheduler add-on itself is free, Heroku requires a valid credit card on file to verify accounts.
If you don’t have a credit card handy, a fantastic alternative is PythonAnywhere. Simply upload your script, head over to the Tasks tab, and configure your daily execution time. Since it’s on a free tier, there are some minor outbound network restrictions, but it works perfectly for simple automation scripts like this one.